Adding code to the head section of your WordPress site is something you must learn if you own a website. For me, it’s a common requirement when I need to integrate third-party software like Tag Manager, Google Analytics, email marketing tools, etc.
So, how to add code to head in WordPress? To add code to the WordPress header, you have to manually edit the header.php file to insert your code snippet below the opening <head> tag. Or, you can use a plugin like “WP Beginner’s Insert Headers and Footers” to add code specifically to the header section.
I know this one-liner doesn’t help you at all. Don’t worry, my guide below will walk you through the whole process step-by-step.
How to Add Code to Head in WordPress Manually (Step-by-step Guide)
Let’s first check out the mainstream process of manually adding code to your WordPress header file.
Step #1: Obtain the Code
- First, acquire the code snippet you wish to add to your WordPress header. In my example, I’ll use Google Analytics code.

Step #2: Access the WordPress Theme Editor
- Log into your WordPress account.
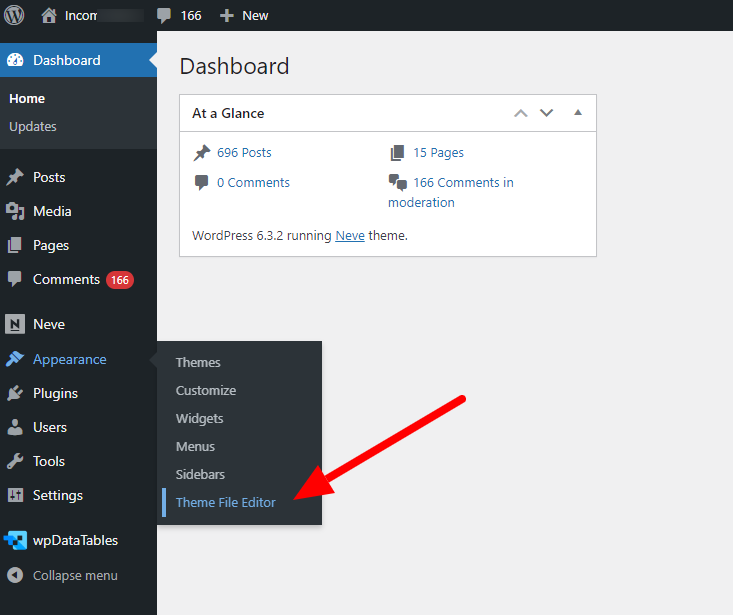
- On the left sidebar, hover over “Appearance” and then click on “Theme Editor”.

Step #3: Locate the Header.php File
- Within the Theme Editor, on the right-hand side, you’ll find a list of theme files.
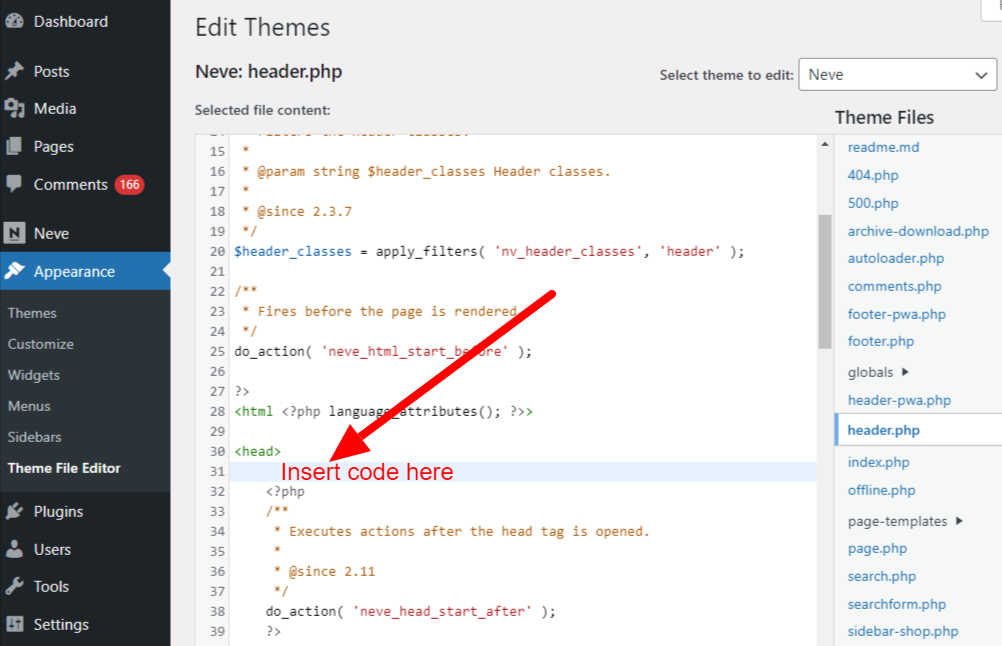
- Scroll down and click on header.php to open the file editor.

Step #4: Insert the Code
- In the header.php file editor, locate the <head> tag.

- Paste your code snippet right below the <head> tag. This places the code within the head section of your WordPress website.
Note: When pasting the code, ensure it is placed just below the <head> tag and above any other code to prevent any conflicts or issues.
Step #5: Save and Update
- After pasting the code, click on “Update File” to save the changes.
- A message “File edited successfully” will appear, confirming that the changes have been saved.
Pro Tip: I don’t recommend adding code directly to the parent theme file, instead I recommend to first add a child theme and then add the code to your child’s theme header.php file.
Use Plugin to Add Code to Head in WordPress: Most Common & Best Method
You can use third-party plugins to insert any code into your WordPress header. This method is highly recommended for beginners as it is straightforward and less risky.
Step #1: Accessing the Plugin Section:
- Log into your WordPress admin area.
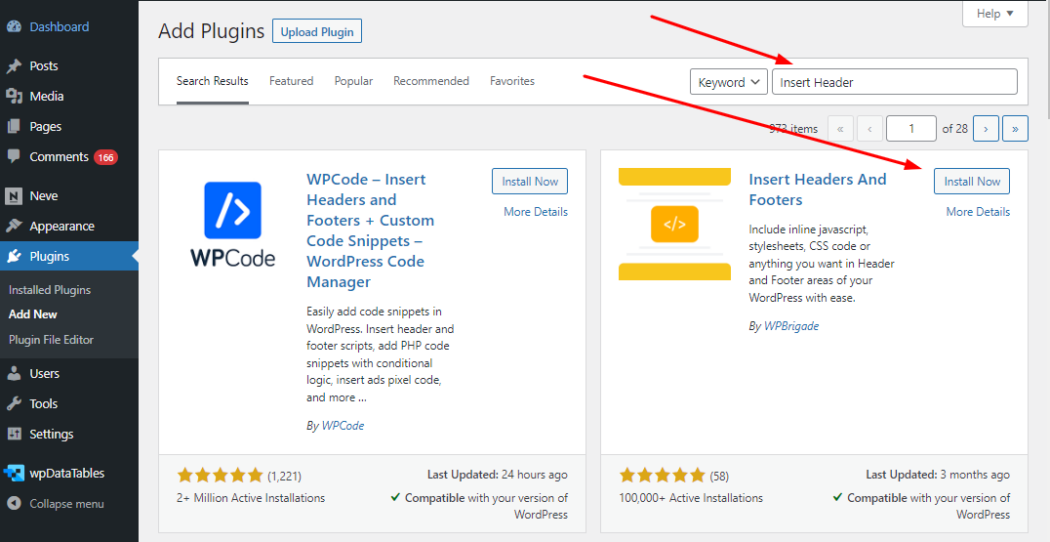
- On the left-hand side, navigate to Plugins > Add New.
Step #2: Installing the Plugin:
- In the search box, type “insert header“.

- Look for a plugin named “Insert Headers and Footers by WPBrigade” and click Install Now.
- Once installed, don’t forget to click Activate.
Step #3: Adding Code to the Head:
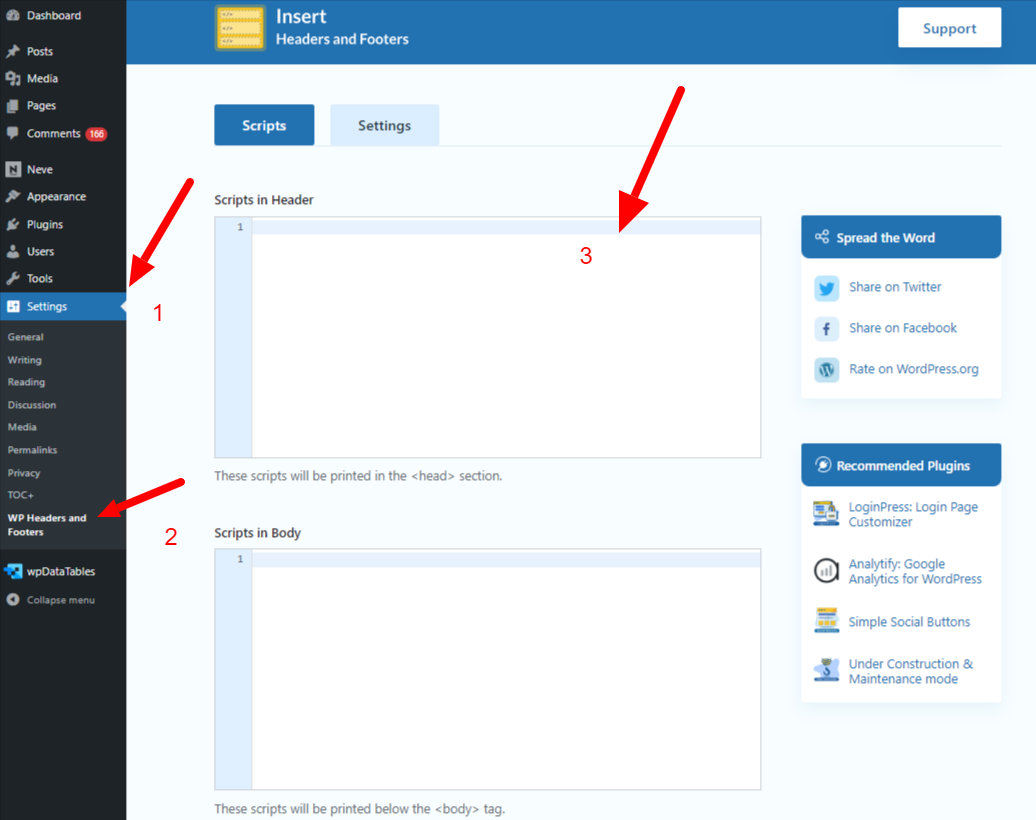
- On the left-hand side, navigate to Settings > Insert Headers and Footers.

- In the opened window, you will see three fields: “Scripts in Header,” “Scripts in Body,” and “Scripts in Footer.“
- Paste your code in the “Scripts in Header” field.
- Click Save to apply the changes.
Still not getting the steps? Watch this video.
How to Add Code to Head Tag in WordPress (JS, JavaScript, CSS)
Use Cases for Adding Code to the Head Section in WordPress
The head section is an important element for WordPress website customization and optimization. While plugins and themes can handle the addition of common codes, such as style and meta tags, direct code insertions into the head section are crucial for greater control over performance, security, and the integration of essential web services. These customizations can lead to improved load times, enhanced user experiences, and provide better insights into website usage and visitor behavior. Below are 7 common use cases for adding a code snippet to the head section of a WordPress site.
- Third-Party Tool Integration:
Adding scripts for tools such as Google Analytics or Tag Manager, which are essential for tracking user behavior and website performance. - Webmaster Tools Verification:
Placing verification codes from services like Google Search Console or Bing Webmaster Tools to confirm ownership and manage your site’s search engine presence. - Security Enhancements:
Implementing Content Security Policy (CSP) headers to increase security by defining trusted content sources and protecting against common attacks. - Performance Optimization:
Inserting link rel=’dns-prefetch’ and link rel=’preconnect’ tags to resolve domain names and establish network connections early, which can reduce page load times. - Custom Fonts or Icons:
Embedding custom fonts or icon sets from services like Google Fonts or Font Awesome that need to be loaded before the page content. - Custom JavaScript Execution:
Injecting custom JavaScript that needs to run before the website is rendered, such as cookie consent prompts or site-wide alerts. - Favicons and App Icons:
Specifying icons for multiple devices and resolutions to enhance branding and ensure a coherent visual presence across platforms.
Adding Code to Head: Potential Errors and Their Solutions
Adding code to the head section of a WordPress site is crucial for accomplishing different tasks some of which I covered in the section above. However, adding any code snippet to the site specially in the head section can sometimes lead to errors, such the ones I laid down below:
Error #1: Incorrect Code Syntax
Incorrect syntax error occurs due to missing semicolons, brackets, or incorrect use of syntax within the code being added. This leads to broken features on your website.
Solution:
- Utilize code validation tools such as JSHint or CSS Lint to identify and correct syntax errors before pasting the code into the head section of WordPress.
Error #2: Code Conflicts
Problem: Code conflicts occur when the newly added code interferes with existing code on your site. This could be due to multiple JavaScript libraries or conflicting CSS styles. It causes unexpected behaviors or styles on your site.
Solution: Isolate the conflicting code by commenting out sections of the code and testing the site. Once identified, modify the code to resolve conflicts.
Error #3: Loading Sequence Errors
Problem: The sequence in which scripts or stylesheets are loaded will impact the functioning of a website. If a script that’s dependent on another script is loaded first, it will result in errors. This error will give you non-functional features or scripts on your website.
Solution: Ensure that dependent scripts are loaded in the correct sequence. WordPress offers functions like wp_enqueue_script and wp_enqueue_style to control the loading sequence of scripts and styles. Use these to fix this issue.
Error #4: Incorrect File Permissions
Problem: Incorrect file permissions can prevent WordPress from accessing the files. This prevents the code in the head section from being executed.
Solution: Adjust file permissions via an FTP client or through cPanel to ensure WordPress has the necessary access to execute the code.
Best Practices for Adding Code to Header in WordPress
Just like any task, there are quick-and-dirty methods as well as best practices. Now, I’d like to share with you some of the best practices for adding code to the WordPress header—these are the techniques that I personally use.
1. Always Use Child Themes:
When you inject code directly into the header of your parent theme, you run the risk of losing all modifications upon the theme’s update. With the use of a child theme you can ensure the longevity of the custom code you add to the head section of your WordPress site even after theme updates.
Child themes, inherit the functionality of the parent theme. But they preserve all custom modifications, which makes them an ideal tool for storing custom code snippets and any other customizations.
2. Enqueue Scripts and Styles:
WordPress has built-in functions for enqueuing scripts and styles. Enqueuing ensures that different code snippets are loaded in the correct order, and dependencies are honored. This orderly loading prevents conflicts and errors that could arise from incorrect script or style loading sequences. Because you are adding code to the head section of the site, it is important to use built-in enqueuing functions to make sure your code will be added in the correct order.
So, use `wp_enqueue_script` and `wp_enqueue_style` functions for enqueuing scripts and styles.
3. Load Scripts Asynchronously:
The use of synchronous scripts can block page rendering, leading to longer load times. When adding custom code to the head section of your site, ensure you use the “async” attribute to enable scripts to load asynchronously, preventing any delay in page rendering.
<script src="external-library.js" async></script>
In contrast, asynchronous loading allows the browser to continue rendering the page while the script is being downloaded and executed. This significantly improves the page load time.
4. Always Use Browser Caching:
Browser caching stores cached versions of static resources, a technique that can significantly speed up page load times and reduce server load. To enable browser caching in WordPress, you can utilize performance plugins like Perfmatters. When adding code to the head section, which may involve inserting static libraries, it’s essential to refresh your caching plugin to ensure the new resources are cached properly.
When a user revisits a page on your site, the cached version often loads much faster.
5. Minimize Code:
If you can, reduce the size of your code by removing extra whitespace, comments, and other unnecessary characters or if you are inserting an external library, try to include the minimized version of it. This decreases the file size and allows for faster loading.
This practice of minification reduces the amount of code that needs to be transferred over the network.
Conclusion
In summary, adding code to the WordPress head enables you to perform essential tasks like integrating third-party tools and conducting site verifications.
You can choose to manually edit the header.php file or use plugins to simplify adding code to the head section. As you can see, whether you have technical knowledge or not, the process is straightforward. Happy WordPressing!

