Web design and content creation are replete with nuances that can sometimes turn straightforward tasks into intricate challenges. One such challenge many WordPress users encounter is inserting an image within an ordered list in the Gutenberg editor. What appears to be a simple task can sometimes yield unexpected results, confusing even experienced users.
The Common Challenge: When trying to embed an image within an ordered list in Gutenberg, there’s a frequent hiccup: the editor often recognizes the image as a subsequent list item and automatically assigns a number to it. A natural impulse to correct this might be to click beside the image and press the delete key. However, this action, more often than not, disrupts the sequence of the list, causing the following item to reset to number one. Such disruptions can be frustrating, especially when trying to maintain a cohesive narrative or sequence.
Understanding Gutenberg’s Features: The Gutenberg editor in WordPress, while powerful, operates with specific logic and structure. By understanding its features better, we can navigate these small roadblocks with ease. In the case of our image insertion challenge, the inline image feature comes to the rescue.
Step-by-step Guide to Perfect Image Insertion:
- Creating a New Line Without Adding a Number: After you’ve decided where you want your image to be, press both ‘Enter’ and ‘Shift’ keys simultaneously (Shift+Enter). This combo is a nifty trick; it lets you start a new line without automatically creating a new list number.
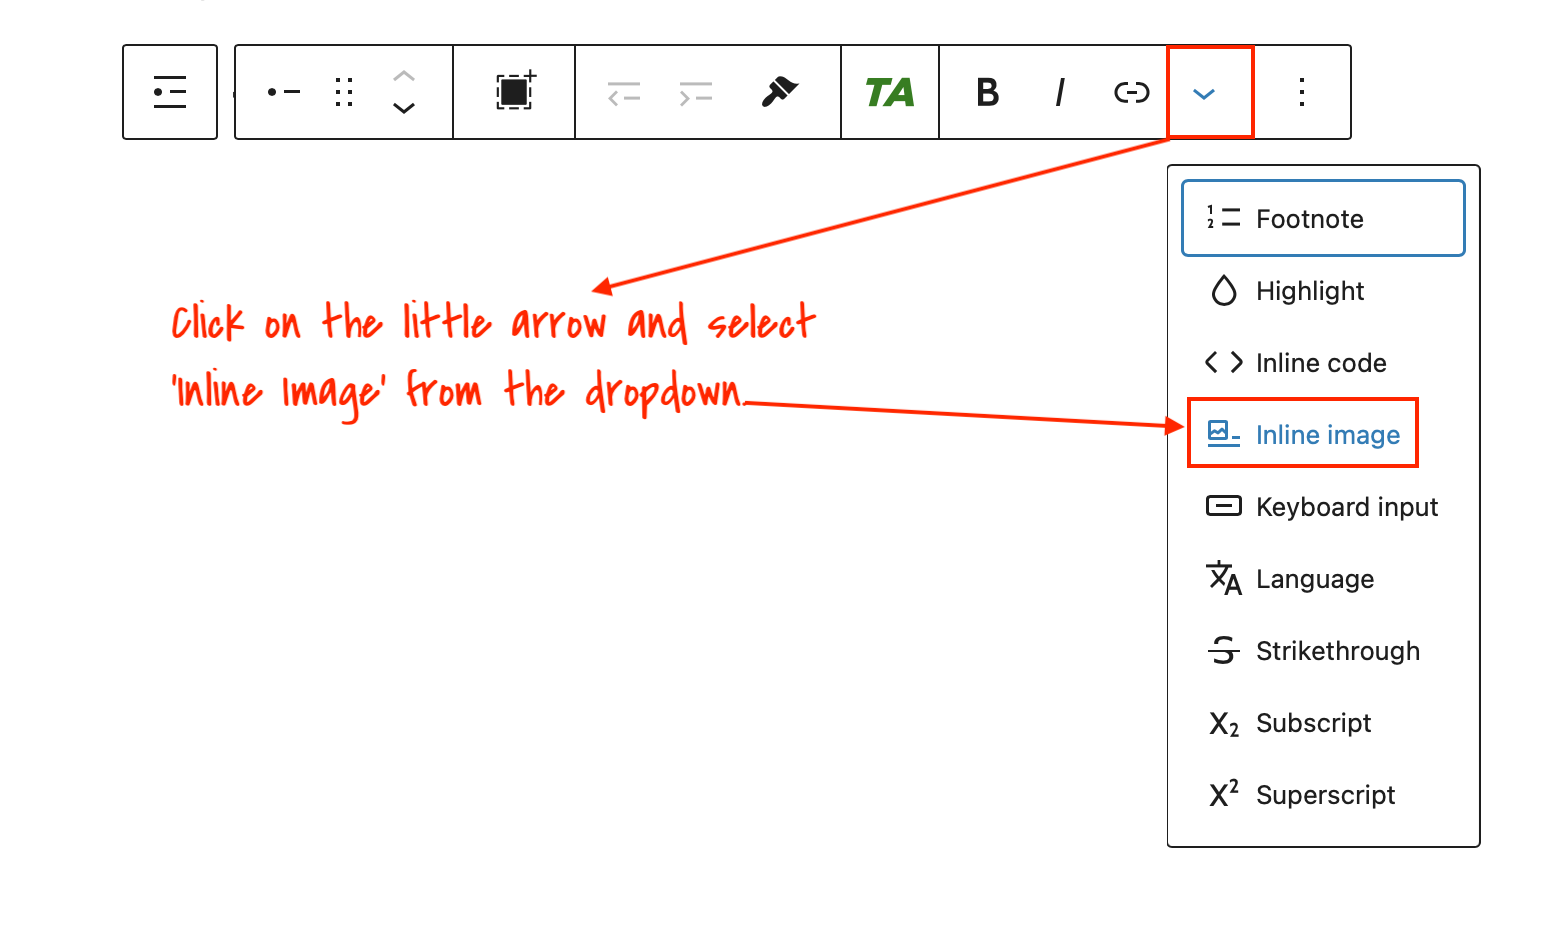
- Finding and Utilizing the Inline Image Feature: As you familiarize yourself with the Gutenberg interface, you’ll notice a variety of icons. One such icon, often represented as a small downside arrow, is your gateway to diverse options. Click on this arrow and, from the dropdown that appears, choose ‘Inline Image’.

- Uploading, Inserting, and Fine-tuning the Image: Now, select and upload your preferred image. Once it’s added to the editor, you aren’t just stuck with its default dimensions. Resize the image to ensure it complements the content and maintains a harmonious visual flow with the list.
Additional Tips:
- Consistency is Key: Always aim for consistency in image size and format, especially if you’re inserting multiple images within your list or throughout your content.
- Optimize Image Sizes: For quicker webpage load times and improved user experience, always optimize images before uploading.
Alternative Solution: Utilizing the HTML Editor for Image Insertion
For those who are comfortable maneuvering through the HTML realm or prefer a more hands-on approach, the Gutenberg editor also provides an HTML option that offers a direct way to modify the content.
Here’s how you can use the HTML editor to insert an image into your list:
- Switch to HTML Mode: Within the Gutenberg editor, select the block containing your list. Once selected, find the three-dot menu (often on the top right corner of the block) and choose ‘Edit as HTML’ from the dropdown.
- Insert Your Image Using HTML: Navigate to the exact spot between the list items where you wish to insert the image. Then, input the following HTML code:
<ul>
   <li>list item 1</li>
   <li>
      <figure class="wp-block-image">
         <img src="url_to_img" alt="">
      </figure>
   </li>
</ul>
Replace “url_to_img” with the direct link to your image, and “Description of Image” with a brief description or alt text. This description improves accessibility and provides context to visitors who might not be able to view the image.
- Return to Visual Mode: After adding the necessary code, switch back to the ‘Visual’ mode using the same three-dot menu. You should now see your image perfectly nestled between the list items.
Tip: The alt text not only enhances accessibility but also plays a crucial role in SEO. Always include relevant and descriptive alt text for your images to improve search engine indexing and provide a richer experience for all users.
Conclusion
In conclusion, while the Gutenberg editor has its learning curve, understanding its functions and features can empower you to create polished, professional content with ease. We hope this comprehensive guide assists you in seamlessly integrating images into your ordered lists, enhancing both readability and visual appeal.

