I remember I was working on a SAAS product that was built based on WordPress (yes, you can build an entire SAAS product using WordPress), and I was on board as an expert with SAAS-WordPress dual expertise to help them improve their user experience. When I reviewed the user interactions with the site, the first thing that I put in my agenda to correct was to improve the logout experience. At the time, they were sending users to the WordPress login page (default WordPress behavior) displaying the WordPress logo and branding, and that was not only terrible in terms of user experience but also very confusing for the user.
If you are looking for a simple way to set up a logout redirect to the homepage or any other URL for your WordPress-based website, you’re in the right place! This guide will walk you through the process of setting a WordPress logout redirection without the need for any plugins.
By default, WordPress redirects users to the wp-admin dashboard after login and to the wp-login page after logout. However, this behavior might not be suitable for every site, especially for business websites, online stores or any WordPress sites that allow user registrations.
There are several reasons you might want to change these default settings. For instance, setting a custom login or logout redirect can enhance security and user experience (prevent customers from seeing the default login and logout pages). This is particularly important if you don’t want users to see or access the default WordPress login page, which is your site’s gate to its backend area.
How to Set Logout Redirect to the Homepage
You can set this redirect in two ways: one with a plugin and the other manually via a code snippet. As an experienced WordPress user, I often prefer to use a non-plugin method. There are many reasons why you should avoid installing so many plugins on your WordPress site, including security, site performance, complexity related to installing too many plugins, and avoiding conflicts between plugins.

Let’s return to the step-by-step logout redirect guide. First, log in to your WordPress site and create a child theme.
Note that before using any custom code on your site, especially if that includes editing your funcation.php file, you should back up the whole site or use a child theme.
If you do not know how to create a WordPress child theme of any theme, you can check this guide on how to create a WordPress child theme.
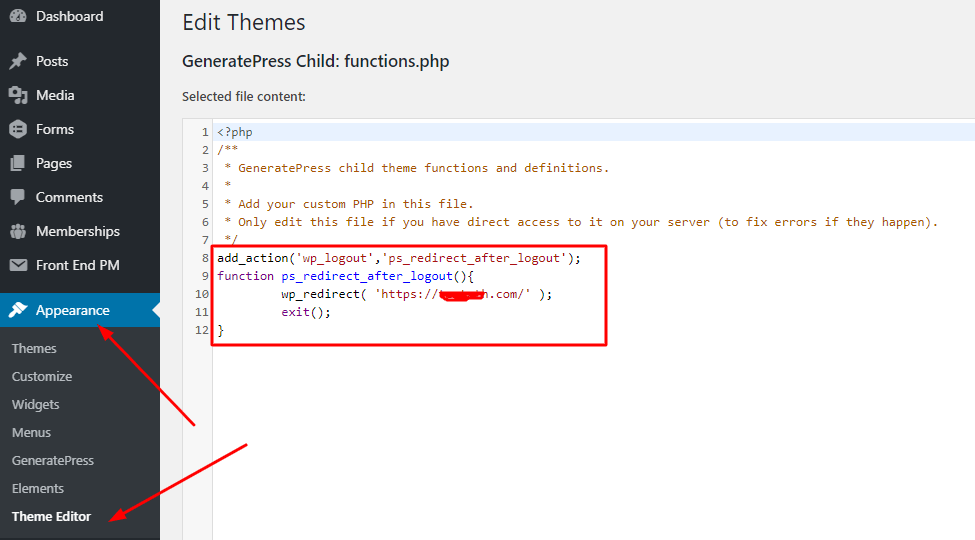
After creating a child theme, go to the funcation.php of your child theme and paste the following codes.
add_action('wp_logout','ps_redirect_after_logout');
function ps_redirect_after_logout(){
         wp_redirect( 'Your redirect URL here' );
         exit();
}
Now, click on the update file button. You are done.
Using a WordPress plugin
There are many WordPress plugins that help you set login and logout redirection. But I recommend using Peter’s Login Redirect, which has over 100K active installations and is one of the best plugins for setting user-specific login-logout redirection.
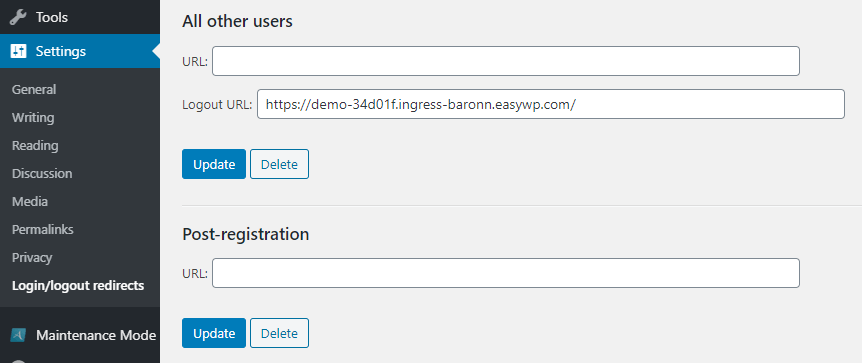
Firstly, install and activate this plugin on your WordPress site, then go to settings>login/logout redirects.

Now go to the ‘All other users’ option and enter the logout URL in the logout URL field. You do not need to enter the site URL in the URL field, so keep it blank.
Then, click on the update button. Now you are done.
Note: With this plugin, you can set a logout redirection with different roles, levels, and users. In this post, I have guided you on how to do it for all users, but doing it for different roles, users, and levels is straightforward.
Now, you can try to log out to check if it is working as expected on your WordPress site.
If you encounter any issues while implementing code on your site or using the plugin, please let us know by commenting below, and I will do my best to get back to you as soon as possible.


Awesome post. worked as described. Thank you so much. Codes before Plugins always!!