A website is essential for businesses, organizations, and individuals to reach a wider audience. WordPress is one of the most popular platforms for building websites and blogs, with millions of users worldwide.
As a website owner, it is crucial to ensure that your site is secure and protected from potential threats. While plugins are an easy and convenient way to enhance the security of a WordPress site, they are not the only solution.
This article will explore various methods to secure a WordPress site without using plugins. This approach can be handy for those who prefer a more hands-on approach to security or have limited resources.
Following this article’s steps, you can keep your WordPress site protected and secure.
Best Advice From Experts to Keep Your WordPress Site Secure
- Keep WordPress up-to-date by using the latest version.
- Regularly update your WordPress themes and plugins.
- Update to the newest version of PHP.
- Remove any unused themes.
- Enable automatic updates for plugins and themes.
- Block specific IP addresses to control access to your site.
- Limit access to the wp-admin folder.
- Choose a strong username and password.
- Restrict the number of login attempts.
- Implement pre-login CAPTCHAs, such as reCAPTCHAs.
- Choose a secure and reliable hosting company.
- Regularly back up your WordPress website.
- Use basic HTTP authentication for additional protection.
- Add HTTPS for encrypted connections with an SSL certificate.
- Secure your wp-config.php File.
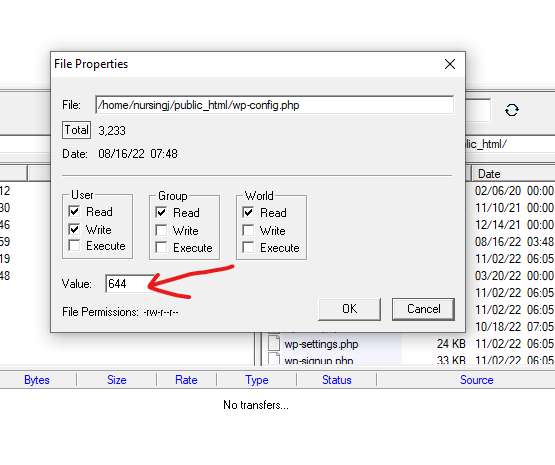
- Set file permissions for the wp-config.php File to 400 or 440.
- Disable XML-RPC.
- Prevent file editing in the WordPress dashboard.
- Hide your WordPress version number.
- Implement DDoS protection, such as through Cloudflare.
- Hide your plugin directory for added security.
13 Ways to Make a WordPress Site Secure Without a Plugin
There are many ways to make your site secure. You can work on each website section separately to make it as secure as you want. Now, I want to include all the necessary and doable methods so anyone can follow them.
1. Disable PHP Error Reporting
PHP Error Reporting is a feature in PHP that displays error messages on the screen when something goes wrong with the code.
These errors can contain sensitive information about your website, including server paths and database details. Hackers can use that information to exploit vulnerabilities of the site.
To disable PHP Error Reporting in WordPress, you can add the following line of code to the wp-config.php File located in the root directory of your WordPress site:
error_reporting(0);
@ini_set(‘display_errors’, 0);
Additionally, disabling error reporting can improve your website’s performance by reducing the amount of data displayed on the screen. This makes your website look more professional and polished, as it will not show error messages to visitors.
2. Migrate to a More Secure Web Host
A web host’s security is crucial for your WordPress site’s safety. A secure web host provides various security features, such as regular backups, firewalls, and intrusion detection systems, to protect your site from potential threats.
Using a secure web host also ensures that your website is regularly monitored and updated to address security vulnerabilities.
To migrate to a more secure web host, follow these steps:
- Research and compare different web hosting types/packages/companies and their security features.
- Back up your current website and its content.
- Create a new account with the new web host.
- Upload your website and its content to the new host.
- Update your domain’s nameserver settings to point to the new host.
- Test your website to ensure everything is working as expected.
Migrating to a more secure web host can significantly improve the security of your WordPress site and help protect it from potential threats.
3. Turn File Editing Off
File editing in WordPress means the ability to edit theme and plugin files directly from the WordPress admin dashboard. This feature can help make small modifications to your website, but it can also be a security risk if not properly managed.
To turn File editing off in WordPress, you can add the following line of code to the wp-config.php File located in the root directory of your WordPress site:
define( 'DISALLOW_FILE_EDIT', true );Turning file editing OFF prevents accidental changes to critical files that could break your website. This can be especially helpful if you are not an experienced web developer and want to avoid making changes that could cause issues.
Finally, by limiting the ability of attackers to modify files on your website, you reduce can the risk of malware infections. In short, turning off file editing is a simple but effective step to make your website more secure and reliable.
4. Restrict Access Using the .htaccess File
The .htaccess File is a configuration file used by Apache web servers to control access to specific directories and files on a website.
The .htaccess File is located in the root directory of your website and you can use it to modify various server-side settings, including restricting access to certain parts of your site.
To restrict access to the wp-admin folder in WordPress, you can add the following code to your .htaccess File:
<Files wp-login.php>
order deny, allow
deny from all
allow from xxx.xxx.xxx.xxx
</Files>
Replace “xxx.xxx.xxx.xxx” with the IP address of your own computer to ensure that you can still access the wp-admin folder.
There are so many benefits to restricting access to the wp-admin folder on your WordPress site! By limiting the number of people who have access to sensitive areas, you can improve the overall security of your website.
5. Disable XML-RPC
Let me clarify the concept if you need to know what XML-RPC is. It is a remote procedure call (RPC) protocol encoded in XML, which calls methods on a remote server.
In WordPress, XML-RPC provides various features, such as remote publishing, pingbacks, and trackbacks. However, XML-RPC can also be a security risk if not properly managed.
Disabling XML-RPC in WordPress is quite easy. You can add the following code to your .htaccess File:
<Files xmlrpc.php>
order deny,allow
deny from all
</Files>
This code blocks all access to the xmlrpc.php File, effectively disabling XML-RPC in WordPress.
By disabling it, you are preventing potential brute-force attacks on your website, reducing the risk of DDoS attacks, and cutting down on unwanted traffic and spam. So, it is just another step you can take to enhance the overall security of your WordPress site.
6. Hide the WordPress Version
It is important to hide your WordPress version for security reasons. Displaying the version number of your WordPress site publicly makes it easier for hackers to target known vulnerabilities in that specific version.
By hiding your WordPress version, you make it more difficult for potential attackers to determine which vulnerabilities they can exploit on your site.
Hiding the WordPress version is simple and can be done by adding the following code to your theme’s functions.php File:
remove_action('wp_head', 'wp_generator');This code removes the WordPress version information from the header of your site, effectively hiding it from view.
By keeping the version number hidden, you reduce your site’s attack surface and make it less attractive to potential attackers. Hiding the WordPress version is a simple step that can go a long way in securing your site.
7. Block Hotlinking
Have you ever heard of hotlinking? It is when someone takes an image/video from your website and uses it on their own site. This can be a big problem because it slows down your website, uses up your bandwidth, and affects your website’s performance.
Allowing hotlinking opens up your website to several security risks, including:
- Bandwidth Theft: Your website’s bandwidth can be consumed by others without your consent. So it potentially slows down your website and makes it difficult for your own users to access your content.
- Server Overload: Allowing hotlinking can result in an increased server load, leading to slow performance and even crashes.
- Security Vulnerabilities: By linking to an image or resource hosted on your website, hackers can potentially exploit any vulnerabilities present in that File.
- Loss of Control: By allowing others to hotlink to your content, you have no control over how that content is used or presented, potentially leading to unwanted or negative associations.
Blocking hotlinking is super easy! All you have to do is add this code to your .htaccess File:
RewriteEngine on
RewriteCond %{HTTP_REFERER} !^$
RewriteCond %{HTTP_REFERER} !^http(s)?://(www\.)?yourdomain.com [NC]
RewriteRule \.(jpg|jpeg|png|gif|mov|wmv)$ - [NC,F,L]
Don’t forget to replace “yourdomain.com” with your actual domain name. This code will stop other websites from using your images and consuming your bandwidth.
8. Manage File Permissions

File permissions determine who can access, modify, and execute files and directories on your server. They are assigned to each File and folder in your WordPress site and are critical for the security of your site.
Managing file permissions in the terminal would be technical, but it is not too difficult. You can use the chmod command to change the permissions of a file.
For example, to change the permissions of a file called “file.txt” to 644, you can run the following command: chmod 644 file.txt.
Remember that you will need to use an FTP client or a web-based file manager to access your server’s terminal.
For a WordPress site, the recommended file permission settings are as follows:
Directories: 755
Files: 644
Following these file permission settings ensures that your files and directories are accessible to your WordPress site and protected from unauthorized access.
Additionally, these settings balance security and functionality, allowing your site to function as expected while keeping it secure.
9. Protect your .htaccess File
The .htaccess File is one of the most important files in your WordPress site as it contains sensitive information and configurations.
If this File gets into the wrong hands, they can use it to take over your site, modify your site’s behavior, or even steal your information. So, you must protect it from potential threats.
Protecting your .htaccess File is a simple task. You can do it by adding the following code to your .htaccess File:
<Files .htaccess>
order allow,deny
deny from all
</Files>
This code blocks direct access to your .htaccess File, preventing unauthorized users from accessing it.
10. Blocking Certain IP Addresses
Blocking specific IP addresses is an important step in securing your WordPress site. Sometimes, certain IP addresses are continually trying to access your site, even if they are not welcome.
This could be due to spam, hacking attempts, or simply malicious behavior. You can protect your site from unwanted access by blocking these IP addresses.
Blocking IP addresses is simple and can be done by adding the following code to your .htaccess File:
order deny,allow
deny from 123.456.789
Replace “123.456.789” with the specific IP address you want to block. You can add multiple IP addresses by including multiple lines of code.
Blocking specific IP addresses can make a big difference in maintaining site security. By doing so, you will be able to protect your site from unwanted access and reduce the risk of hacking attempts and other security threats.
11. Secure Your wp-includes Folder with .htaccess
The wp-includes folder is a critical part of your WordPress website, as it contains important files that power your site.
So you should keep this folder secure to ensure the smooth operation of your site and prevent unauthorized access.
You can secure the wp-includes folder by adding a few lines of code to your .htaccess File. Here’s an example of the code you’ll need to add:
<IfModule mod_rewrite.c>
RewriteEngine On
RewriteBase /
RewriteRule ^wp-admin/includes/ - [F,L]
RewriteRule !^wp-includes/ - [S=3]
RewriteRule ^wp-includes/[^/]+\.php$ - [F,L]
RewriteRule ^wp-includes/js/tinymce/langs/.+\.php - [F,L]
RewriteRule ^wp-includes/theme-compat/ - [F,L]
</IfModule>
Securing your wp-includes folder is a smart move for any WordPress site owner. Not only does it prevent unauthorized access to sensitive files, but it also gives your website an overall boost in security.
12. Secure Your Login Process
A secure login ensures that the sensitive information you exchange with your websites, such as passwords and other personal information. So, it protects against potential security threats such as hacking and phishing.
Forcing a secure login on your WordPress site is simple. All you need to do is add the following code to your wp-config.php File:
define('FORCE_SSL_ADMIN', true);This will redirect all login and admin pages to a secure (HTTPS) connection, making it much more difficult for hackers to intercept your login information.
By forcing a secure login, you can ensure that your website’s sensitive information is protected against potential security threats, providing a safer and more secure experience for both you and your users.”
13. Setting Up a Safelist and Blocklist for the Admin Page

A safelist and blocklist are lists of IP addresses that are either allowed or blocked from accessing the admin page of your WordPress site. This is an extra layer of security that helps to protect your site from unauthorized access.
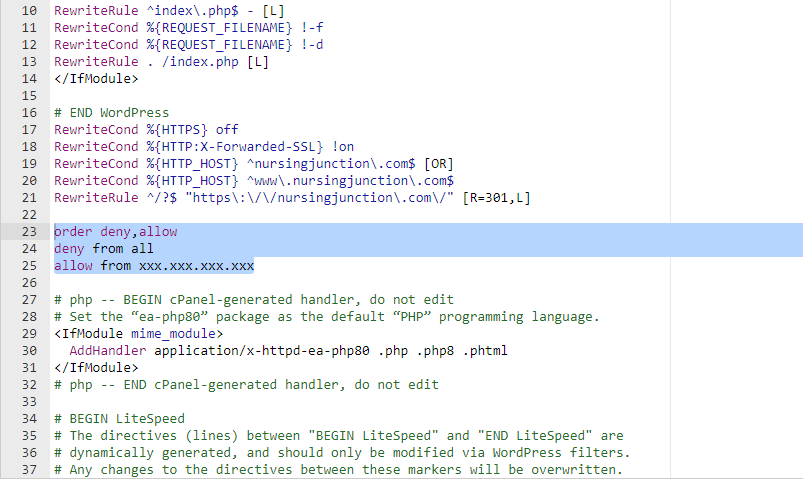
To set up a safelist and blocklist for your admin page, you can add the following code to your .htaccess File:
# Block IPs for login Apache 2.2
<files /wp-login.php>
order deny,allow
allow from xxx.xxx.xxx.xxx
deny from all
</files>
# Block IPS for login Apache 2.4<Files "wp-login.php">
</files>
Replace “xxx.xxx.xxx.xxx” with the IP addresses that you want to allow access to your admin page. To block specific IP addresses, add “Deny from xxx.xxx.xxx.xxx” after “Allow from xxx.xxx.xxx.xxx“.
You should place this rule after the # BEGIN WordPress and # END WordPress statements, as shown below.
Conclusion
By implementing these steps, you are taking all the required measures to protect your website from potential threats. Sure, plugins can make things easier, but many can also slow down your site and leave it vulnerable to security risks.
Doing things manually gives you more control and a better understanding of what’s happening behind the scenes.
So, take some time to go through each step and ensure your WordPress site is secure. Keep your website safe and secure without sacrificing speed or functionality.
Note- Due to continuous updates of the WordPress, theme, plugins, and PHP version, some codes may not work properly. So try yourself. We are not responsible for any errors.
